Полезное в сети

Всегда в теме

Статистика


Яндекс.Метрика


Онлайн всего: 1
Гостей: 1
Пользователей: 0

Рекомендуем


Главная » 2013 » Ноябрь » 6 » Создание эффекта Фотосессия с JQuery и CSS


16:36
Создание эффекта Фотосессия с JQuery и CSS

Создание эффекта Фотосессия с JQuery и CSS


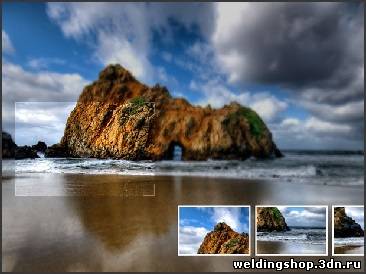
Мы создаем эффект фотосессии с нашим  PhotoShoot JQuery плагин . С его помощью вы можете конвертировать  DIV на странице в стадию моделирования фотосъемки камеры. С помощью этого плагина, мы даем посетителям возможность делать снимки фонового изображения.


ДЕМО                             СКАЧАТЬ


Шаг 1 - XHTML

Поскольку большая часть работа выполняется по PhotoShoot JQuery плагин, наша работа сводится  только к обеспечению DIV, который будет преобразован в стадии фотосъемки.

demo.html


<div id="main">


<!-- The plugin automatically inserts the needed markup here -->


</div>


Вы можете использовать  этот DIV в любом месте на вашей странице. Вам нужно будет указать фиксированную ширину и высоту в таблице стилей для того, чтобы это работало. После загрузки страницы  плагин  инициализируется, дополнительный код вставляется туда же.

demo.html

<div id="main">


<div class="blur" style="......"></div>

<div class="blur" style="......"></div>

<!--  8 more blur divs -->


<div class="overlay" style="opacity: 0.2;"></div>


<div style="......" class="viewFinder">

<img src="photoShoot/viewfinder.png" width="300" height="200">

</div>


<!-- Additional html for the shots is inserted here. Not part of the plug-in.  -->


</div>


Для обеспечения максимальной гибкости, плагин обеспечивает способ выполнить , когда происходит клик. Это именно то, что мы используем для имитации вспышки камеры.


Шаг 2 - CSS

Плагин поставляется со своим собственным стилем ( photoShoot/jquery.photoShoot-1.0.css в демо-файлы), который  определяет внешний вид  компонентов фотосессии, так что нам остается только поработать с моделированием остальной части страницы.

styles.css

#main{

    /* This div is converted to a photoShoot stage by the Photo Shoot plug-in */

    margin:0 auto;

    width:960px;

    height:600px;

}


.shot{

    /* These contain a scaled down version of the background image: */


    border:3px solid #FCFCFC;

    float:right;

    position:relative;

    margin-left:10px;

    overflow:hidden;


    /* Adding a CSS3 shadow below the shots: */


    -moz-box-shadow:0 0 2px black;

    -webkit-box-shadow:0 0 2px black;

    box-shadow:0 0 2px black;

}


.shot img{

    display:block;

}


.album{

    /* This div holds the shots */

    bottom:50px;

    height:110px;

    overflow:hidden;

    position:absolute;

    right:20px;

    width:490px;

}


.album .slide{

    /* The slide div is contained in album  */

    width:700px;

    height:110px;

    position:relative;

    left:-210px;

}


Шаг 3 - JQuery

script.js

$(document).ready(function(){


    // This code is executed after the DOM has been completely loaded


    // Assigning the jQuery object to a variable for speed:

    var main = $('#main');


    // Setting the width of the photoshoot area to

    // 1024 px or the width of the document - whichever is smallest:


    main.width(Math.min(1024,$(document).width()));


    // Creating an array with four possible backgrounds and their sizes:

    var pics = new Array(

                { url:'http://farm4.static.flickr.com/3595/3405361333_77f2a5e731_b.jpg', size:{x:1024,y:677}},

                { url:'http://farm4.static.flickr.com/3028/2753126743_4249a4e948_b.jpg', size:{x:1024,y:768}},

                { url:'http://farm4.static.flickr.com/3641/3595250019_5a1237899a_b.jpg', size:{x:1024,y:768}},

                { url:'http://farm3.static.flickr.com/2592/4018062274_1f7f23597d_o.jpg', size:{x:1158,y:756}}

    );


    // Choosing a random picture to be passed to the PhotoShoot jQuery plug-in:

    var bg = pics[parseInt(Math.random()*4)];


    // Creating an options object (try tweeking the variables):

    var opts = {

        image                          :              bg.url,

        onClick                        :              shoot,

        opacity                        :              0.8,

        blurLevel    :              4

    }


    // Calling the photoShoot plug-in and converting the #main div to a photo shoot stage:

    main.photoShoot(opts);


    // Adding the album holder to the stage:

    $('<div class="album">').html('<div class="slide" />').appendTo(main);


    // Our own shoot function (it is passed as onClick to the options array above):

    function shoot(position){

        // This function is called by the plug-in when the button is pressed


        // Setting the overlay's div to white will create the illusion of a camera flash:

        main.find('.overlay').css('background-color','white');


        // The flash will last for 100 milliseconds (a tenth of the second):

        setTimeout(function(){main.find('.overlay').css('background-color','')},100);


        // Creating a new shot image:

        var newShot = $('<div class="shot">').width(150).height(100);

        newShot.append( $('<img src="'+bg.url+'" width="'+(bg.size.x/2)+'" height="'+(bg.size.y/2)+'" />').css('margin',-position.top*0.5+'px 0 0 -'+position.left*0.5+'px') );


        // Removing the fourth shot (the count starts from 0):

        $('.shot').eq(3).remove();


        // Adding the newly created shot to the album div, but moved 160px to the right.

        // We start an animation to slide it in view:


        newShot.css('margin-right',-160).prependTo('.album .slide').animate({marginRight:0},'slow');

    }

});


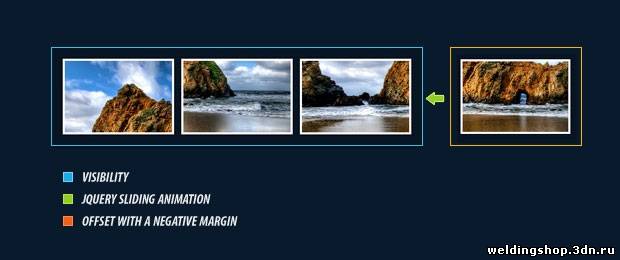
Каждый раз, когда вы щелкните область, она  добавляется в слайд DIV вправо. После этого начинается анимация, которая  скользит его в режиме просмотра и толкает другие  кадры, влево, скрывая самый левый.

Важно, чтобы удалить снимки, которые не видны с удаления () метод. Таким образом, мы можем предотвратить захламление ненужными  элементами.


С помощью этого эффекта Фотосессия  завершена!

Заключение

Сегодня мы использовали подход к решению проблемы создания фотосессии эффект с чистым CSS и JavaScript. Вы можете свободно использовать методы продемонстрированные здесь и экспериментировать с кодом. Есть много возможных применений особенно в системах навигации  промо-сайтов.


Источник

Категория: CSS//HTML//JS | Просмотров: 786 | Добавил: Wrecker | Рейтинг: 0.0/0
Всего комментариев: 0
Добавлять комментарии могут только зарегистрированные пользователи.
[ Регистрация | Вход ]

Поиск

Вход

Гость
  • Вход
  • Регистрация
  • Читаемое

    Категории

    Заходи не жди